Configuring automatic backups of your website means never having to worry about losing your website’s data in the case of an emergency.
In this tutorial you will learn how to configure automatic daily backups of your website on Google Cloud by configuring an automatic-backup script.
The automatic backup script creates a new backup (snapshot) of your website based on predefined specifications which you’ll define in this tutorial.
Getting started
Before stating this tutorial, it is essential that you reserve a static IP address for your VM instance. If you don’t reserve a static IP address before starting this tutorial, Google Cloud will automatically assign a new IP Address to your VM instance when it restarts.
If you haven’t yet launched a website on Google Cloud, check out the following beginner tutorials for instructions on how to install WordPress on Google Cloud:
- How to Install WordPress on Google Cloud for Beginners
- How to Configure a Domain Name for WordPress on Google Cloud
There are 5 steps in this tutorial:
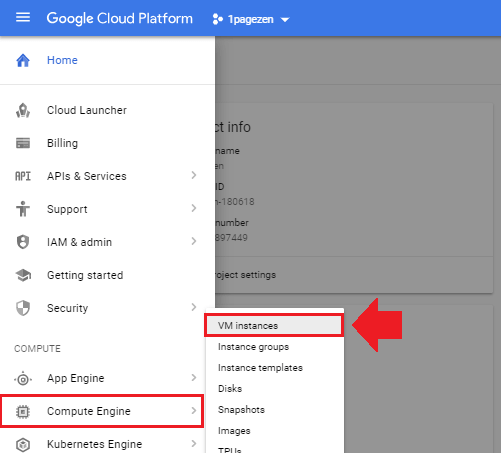
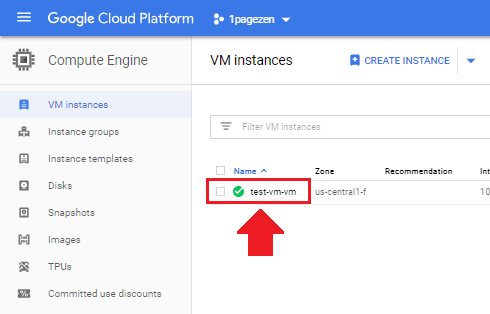
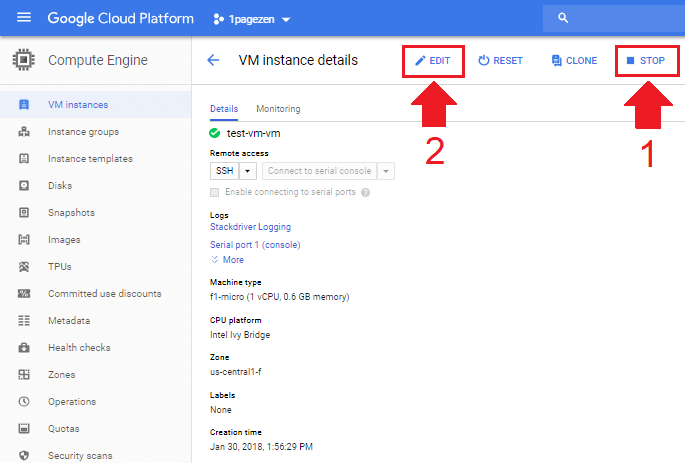
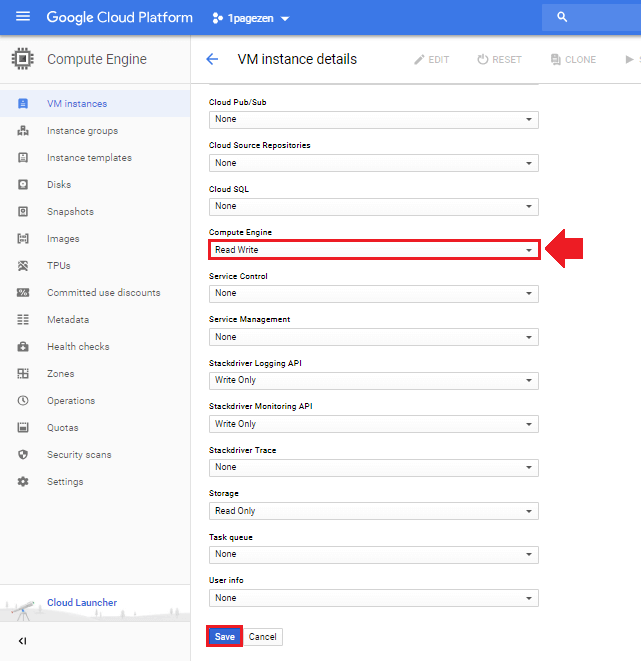
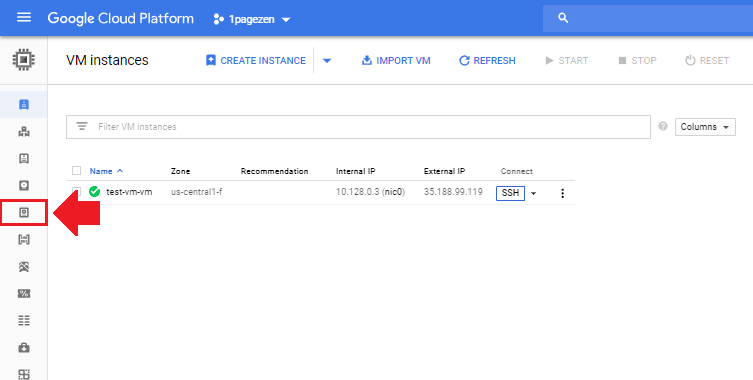
1. Enable Compute Engine access
2. Clone automatic backup script
wget https://raw.githubusercontent.com/jacksegal/google-compute-snapshot/master/gcloud-snapshot.sh

chmod +x gcloud-snapshot.sh

sudo mkdir -p /opt/google-compute-snapshot

sudo mv gcloud-snapshot.sh /opt/google-compute-snapshot/
3. Create cronjob to automate script
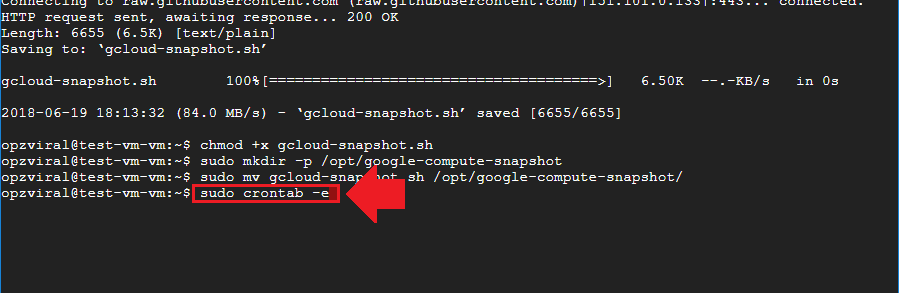
sudo crontab -e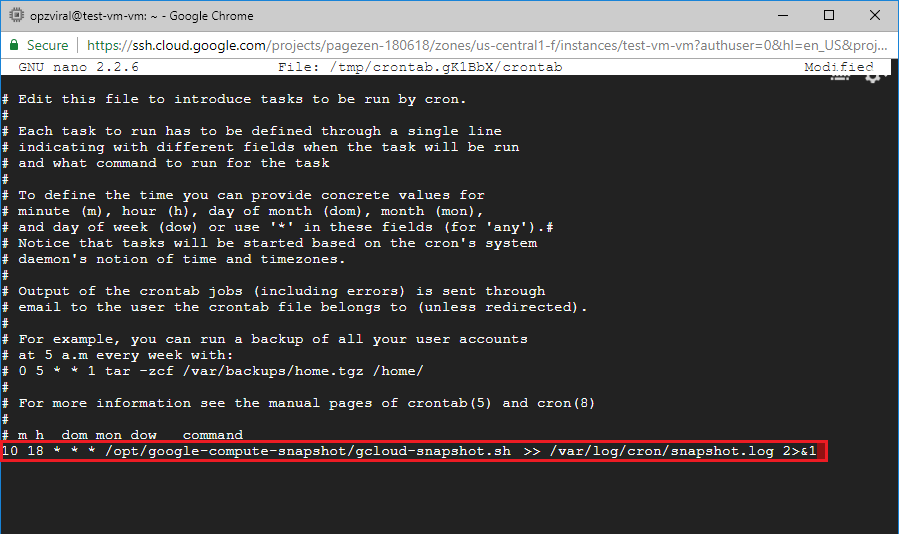
10 18 * * * /opt/google-compute-snapshot/gcloud-snapshot.sh >> /var/log/cron/snapshot.log 2>&14. Enable logging for cronjob
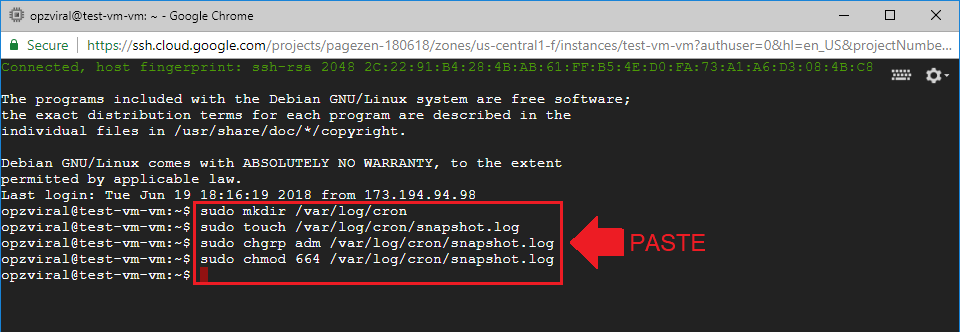
sudo mkdir /var/log/cron

sudo touch /var/log/cron/snapshot.log

sudo chgrp adm /var/log/cron/snapshot.log

sudo chmod 664 /var/log/cron/snapshot.log
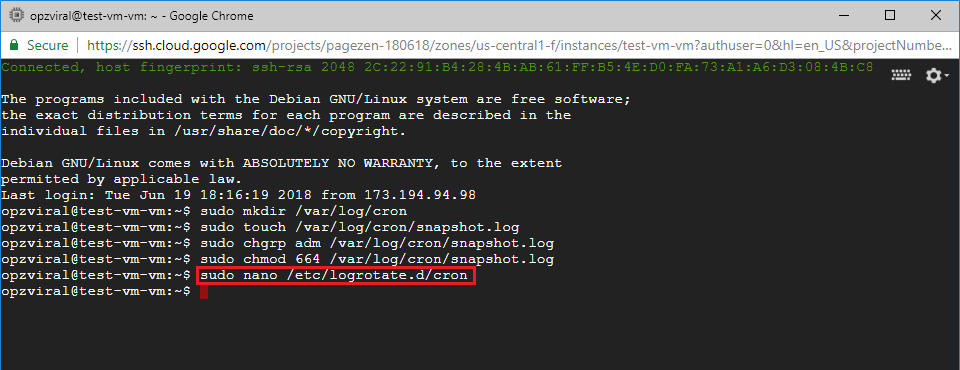
sudo nano /etc/logrotate.d/cron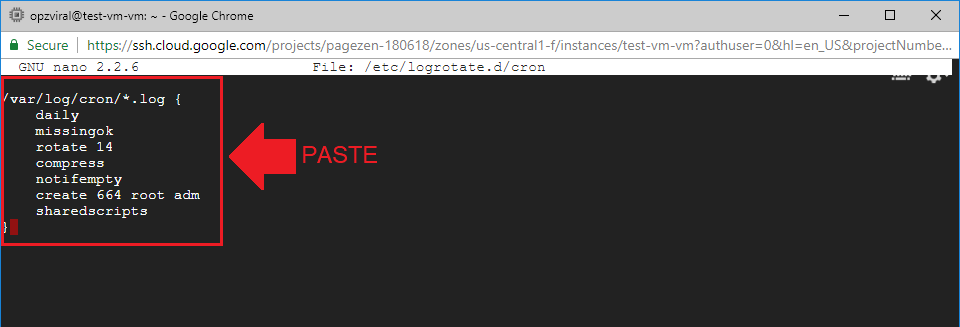
/var/log/cron/*.log {

    daily

    missingok

    rotate 14

    compress

    notifempty

    create 664 root adm

    sharedscripts
}
5. Optional configurations
Defining the total number of backups to save
In this tutorial, you configured the system to save a total of 7 backups. You can change the total number of backups to whatever you want, simply by incorporating the -d flag.
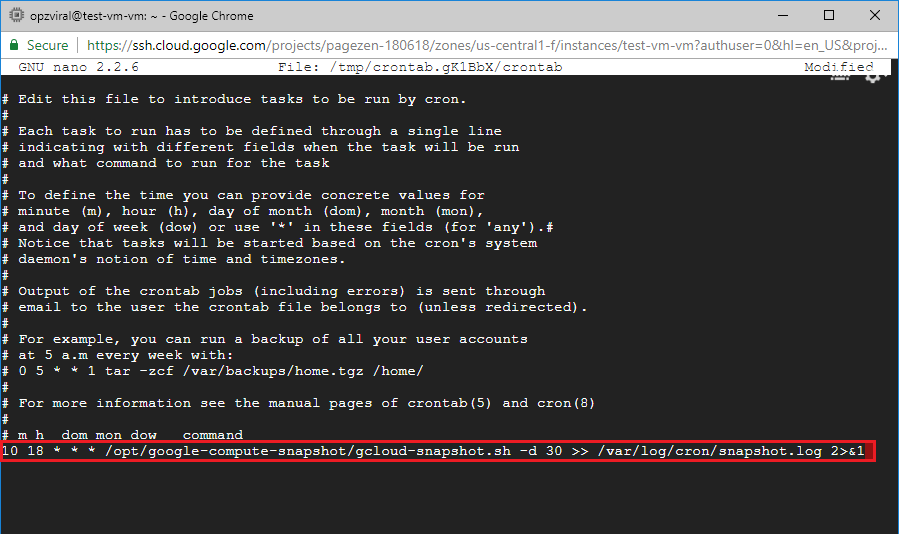
10 18 * * * /opt/google-compute-snapshot/gcloud-snapshot.sh -d 30 >> /var/log/cron/snapshot.log 2>&1Testing the automatic backup script
You can test whether the automatic backup script is working by executing the backup script in your SSH terminal.
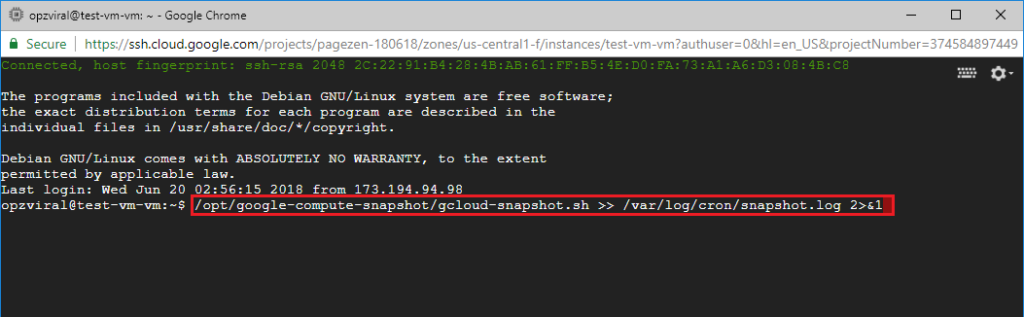
/opt/google-compute-snapshot/gcloud-snapshot.sh >> /var/log/cron/snapshot.log 2>&1
sudo cat /var/log/cron/snapshot.log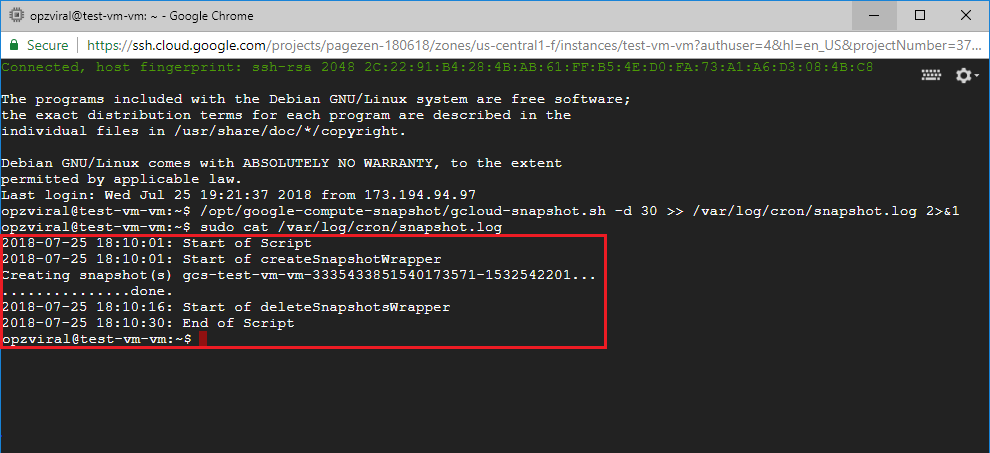
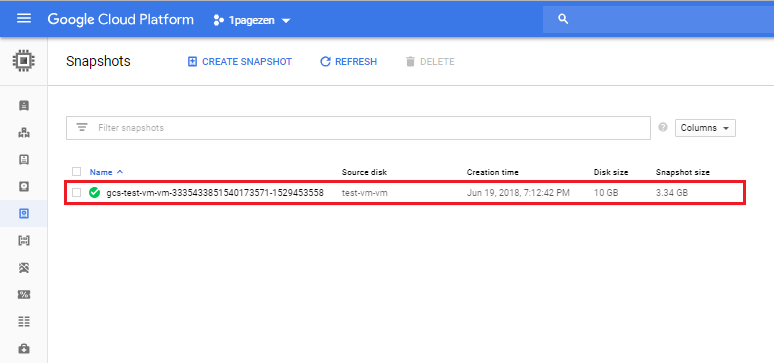
Viewing your backup files
Closing thoughts
If you have any questions or comments, please leave them in the comment field below.
Special thanks to Jack Segal for creating the automatic snapshots script.
For troubleshooting support, be sure to check out the WordPress Cloud Hosting Support Group on Facebook.
![]()
Dave says
Thank you for your amazing tutorial; worked a treat, thank you.
On a side note; how do I set the LOCATION of the snapshot.
My VMs are stored in Europe-west2, which is London, but when I run your script, it lists it as EU which I’m guessing is not in London.
This is then outside of my preferred Zone and possibly subject to out of zone charges.
Is there a way to get the snapshot to create in a specific zone?
Thanks in advance
Leron Amin says
Hi Dave,
If it’s just listed as EU, then it’s a multi-regional snapshot. In your case it’s EU (European Union), which is the multi-region in which your instance exists. The script would have created the snapshot in the same region (or in your case, multi-region), as your virtual machine instance.
Can you provide additional details (preferably from the Google Cloud docs) of what you’re referring to when you mention “out of zone charges”?
Hope this sheds some clarity, and please let me know if you have other questions!
Joe
Jhonathan says
Hi,
First of all thanks for all your articles and videos they really are very useful.
My query is whether it is possible to schedule a backup without stopping the instance and without writing the code?
I have seen that you can do it manually and that you would only have to assign the capture schedule to the disk
Leron Amin says
Hi Jhonathan,
The Google Cloud team has recently added functionality that allows you to create snapshots schedules through the UI. The great thing about this method is that it does not require you to stop the instance or write any code. You can find additional instructions here.
Let me know if you have other questions,
Joe
Jhonathan says
Hi Joe,
Thank you very much for answer it has been very helpful.
sancht says
I would like to update my PHP as the wordpress is showing the PHP Version of 7.3 and I checked the latest version is 7.4.
Please guide me how to update the php in bitnami single site server. Also how to optimize the SQL bin-log. As it is churning up my space
Leron Amin says
Hi Sancht,
For Bitnami installs, upgrading PHP via the terminal isn’t possible. The best practice, according to Bitnami admins, is to migrate the application to a new VM with upgraded software components.
I’m currently working on a tutorial that will demonstrate this process.
Let me know if you have any other questions,
Joe
Nil Geary says
Hello Leron,
First, your site has become my Google, uses it every day 🙂
So first of all thank you for all the investment of precious time!
We did a backup and when we tried to use snapshot we got a certain error –
sudo /opt/bitnami/ctlscript.sh restart apache —->>>
(98)Address already in use: AH00073: make_sock: unable to listen for connections on address [::]:80
(98)Address already in use: AH00073: make_sock: unable to listen for connections on address 0.0.0.0:80
Supposedly when the IP changes then, Apache is not working or apache service is taking different path of files for the project, Apache php mysq phpmyadmin everything get restarted
Is this a known bug in Google Cloud when using a snapshot backup?
Thank you very much!
Leron Amin says
Hi Nil,
Glad to hear the tutorials have been helpful for you! 🙂
First of all, make sure you’re using a static IP address for your instance. If you’re migrating your WordPress install to a new instance, then you should also assign the WordPress site’s static IP address to the new instance.
That aside, to fix this error, you need to kill the existing process on port 80. Follow the instructions in this comment, making sure to replace 8080 with 80. Once the process is killed, start your services again.
Let me know if you have questions!
Joe
Arushi says
How to get your website back if once the free trial is over and you want to migrate it to a new place? As the trial is over I can’t access even the wordpress. The error: “taking too long to respond” is coming up. Also when I have upgraded my account(where it said that if I did within 1 month all my data will be back but its not back) and it says that I have $40 more credits left after the upgrade and so there has been no transaction yet. I tried changing just the nameservers but that won’t bring the website back. I also have no backup of the website. If I buy one month plan for GCP will it bring my website back? (Then I can properly use all those plugins to migrate it to some other hosting)
If not, then please please please suggest something which may bring the data of the website back.
Leron Amin says
Hi Arushi,
Does the instance still display when you navigate to Compute engine > VM instances?
If so, your data should be there. If your VM instances dashboard isn’t showing any instances, then it’s likely it was deleted. In this case, you will either need to restore the instance from a snapshot or import an external backup.
Let me know if you have questions,
Joe
Arushi says
Yes the instance is showing up. And also, I restarted the instance but it is still showing the same error.
Leron Amin says
Hi Arushi,
Did you check your VPC network configuration? It’s likely that the instance was assigned a new ephemeral IP address after it rebooted, and you’ll therefor need to make sure that the A record is assigned to the correct (new) IP address in your Cloud DNS Zone settings.
Look into this and let me know if you have questions,
Joe
Arushi says
It shows the same IP Address everywhere, in the VPC network configuration and also in the Cloud DNS Zone. How do I know if that is changed?
Also when I click on the Admin URL or Site address in the Deployments section a redirect notice page opens up which asks me to confirm if I want to go to the site.
Where should I see for the changes?
Leron Amin says
You need to navigate to your Compute Engine dashboard by navigating to Compute Engine > VM Instances. From here, your VM instances are all listed, as well as their external IP addresses. Compares this address with the the one in the Cloud DNS zone for this domain, and make sure it matches.
Arushi Soni says
Hello Joe,
I talked about this issue with the google cloud platform support and they responded with this message:
“You have firewall rules to allow access to port 80 and 443, but only port 80 is responding to requests.
I looked up your domain name http://www.nbpinteriors.in and it can be resolved to your external IP address, so we know the issue is not due to DNS.
At this point I am suspecting your issue is due to an expired SSL certificate. This would explain why port 443 is not responding. Please check your wordpress site set up to confirm if the SSL certificate is expired (we cannot inspect what is inside an instance). In addition, you have 2 extra firewalls rules (wordpress-1-tcp-443 and wordpress-1-tcp-80) that are redundant. since you already have 2 default firewall rules to allow port 80 and 443. You might want to delete the redundant firewall rules to clean things up.”
I deleted the firewall rule 443 now I think I just need to remove the SSL certificate which I installed using your tutorial. Can you please tell me how to do that?
Leron Amin says
Hi Arushi,
Your certificate is valid. The SSL issues are being caused by ‘mixed content’ – meaning your server is serving certain scripts and images via http:// instead of https://. You can see which scripts and images are causing the problem by checking the Chrome devtools console.
Check out step 1 of this tutorial for instructions on addressing ‘mixed content’ errors.
Let me know if you have questions,
Joe
MiaXOXO says
Thank you for the instructions. Are you aware if there have been some changes since this was written? I followed directions to the T and receive an error upon testing/reading the log:
[code/]sudo cat /var/log/cron/snapshot.log
[2019-11-26 18:10:01]: Start of google-compute-snapshot
ERROR: (gcloud.compute.disks.list) Some requests did not succeed:
– Insufficient Permission: Request had insufficient authentication scopes.
tput: No value for $TERM and no -T specified
tput: No value for $TERM and no -T specified
tput: No value for $TERM and no -T specified
tput: No value for $TERM and no -T specified
[ERROR]: No disks were found – please check your script options / account permissions.
[2019-11-26 20:39:46]: Start of google-compute-snapshot
ERROR: (gcloud.compute.disks.list) Some requests did not succeed:
– Insufficient Permission: Request had insufficient authentication scopes.
tput: unknown terminal “xterm-256color”
tput: unknown terminal “xterm-256color”
tput: unknown terminal “xterm-256color”
tput: unknown terminal “xterm-256color”
[ERROR]: No disks were found – please check your script options / account permissions.
[/code]
Leron Amin says
Hi Mia,
It’s now possible to configure snapshots from directly within the Google Cloud console itself (which I’d recommend doing).
That being said, if you need the added flexibility that the script provides, then read on…
The issue you described is related to the permissions of your Google Cloud instance. Navigate to Compute Engine > VM Instances, then click on the instance that’s running your website and click the ‘Edit’ button at the top of the page. Next, scroll down to the ‘Identity and API Access’ section of your instance settings page, and in the ‘Access Scopes’ section, select the ‘Allow full access to all Cloud APIs’ option. Next, try configuring the snapshots script again.
Let me know if you have questions,
Joe
yousef says
Hi ,
How can we change the time of each backup ,If I need to take a single backup every 3 days.
Thank you
Leron Amin says
Hi Yousef,
You can configure a ‘Snapshot Schedule’ to create hourly, daily, and weekly snapshots using the tab at the top of the dashboard when you navigate to Compute Engine > Snapshots.
If you’re looking to configure snapshots specifically for every three days, you would add the following line of code to your crontab file:
Hope this helps, and let me know if you have any questions!
Joe
imran says
Thanks leron for the guide
When i created th cronjob then this appeared
no crontab for root – using an empty one
Select an editor. To change later, run ‘select-editor’.
1. /bin/nano <—- easiest
2. /usr/bin/vim.basic
3. /usr/bin/vim.tiny
How can i solve it?
Leron Amin says
Hi Imran,
Select option 1 to use Nano as your default editor.
Let me know if you have questions,
Joe
Imran says
How can i change my hosting from google cloud to another hosting? I didn’t find any videos or articles regarding this. My website is running in wordpress.
Leron Amin says
Hi Imran,
You could deploy a new WordPress installation on a new server, then export and re-import your WordPress installation to the new server using the instructions for the All-in-One WP-Migration plugin as outlined in this tutorial.
Hope this helps, and let me know if you have any questions,
Joe
Jan says
Hello
I don’t do snapshot.So if is possible to restore website,before website down.I have backup but is to old,i need that changes that i make and don’t do backup for them.
Anyway,great tutorials you have here.
Thanks
Leron Amin says
Hi Jan,
Use these instructions for automating snapshots – this way you’ll always have a recent backup of your website in case of an emergency.
Let me know if you have questions,
Joe
Ayoub says
Hello Leron,
I have a serious problem, I tried to restore my website (created with GCP using Bitnami) then my wp-admin doesn’t work (also my home page) I got this problem:
on wp-admin page:
One or more database tables are unavailable. The database may need to be repaired.
on homepage:
Error establishing a database connection
I already tried everything available online, but nothing seems to work for me, and as you’re my mentor (I used all your tutorials to start my website from the begging) I’m asking you DISPARATELY to help me figure this out.
Leron Amin says
Hi Ayoub,
Were you able to fix the error? Also, what changes were you making to your VM instance that may have caused the database issue?
If possible, I’d recommend restoring the website from a snapshot (see part 2 of this tutorial for instructions).
Talk to you soon,
Joe
Ayoub says
Thank you Joe,
I already solved the problem, it was DB related, had to activate the phpmyadmin and create a database for all the posts from scratch (I had no backup for the last year, the recent one was on April 2018)
Yes, it took me 14 hrs to restore everything (posts were restored from Google Cache) but I did learn a hard lesson: “Always Keep Backups FGS”
P.S The issue was caused by the UpdraftPlus plugin, trying to restore the website but the DB was recurred.
Again, thank you for the great Tutorials, all helpful and can’t appreciate your effort enough.
See ya,
Ayoub.
Leron Amin says
Thanks for the feedback Ayoub – I’m glad you were able to resolve the problem!
Bruno says
You guys have to fix this part where it says -d is for number of backups, in Jack’s git page it says that this stands for the number of days that it will keep the backup stored, as this:
-d Number of days to keep snapshots. Snapshots older than this number deleted.
So -d is not related to the number of backups.
Leron Amin says
Hi Bruno – thank you for bringing this to my attention!
Valentino says
Hi Leron, thank you so much for the tuts! really helpful!
When I tried to run this script it says
/opt/google-compute-snapshot/gcloud-snapshot.sh: line 190: gcloud: command not f ound
[ERROR]: No disks were found – please check your script options / account permis sions.
did I miss something on the script? or there is an issue with my gcp? thanks!
Leron Amin says
Hi Valentino,
You can now configure your snapshot schedules through the platform itself, and no longer have to use the shell. See my response here for more information.
Let me know if you have questions,
Joe
hvalentino says
I see, thanks!
Fatih DAĞILGAN says
Hi jio;
Thank you very much for your tutorial, it helped me a lot.
I need to your help, I cannot create/update, page or post it is say that “Updating failed”
I tryed too many times reset the machine, install new too many times , restart aphaci but nothing change..
I am trying since 4 days but nothing …
Can you help me
Thanks a lot for now
Leron Amin says
Hi Fatih,
This feature is now built-in to the Google Cloud platform – so you no longer need to manually configure the cron job. From your Google Cloud dashboard, navigate to Compute Engine > Snapshots > Snapshot Schedules (tab).
Hope this helps,
Joe
Bryan says
Hi Joe,
It worked! Thanks! One more thing, can you share a step-by-step guide for Windows VM? I badly need it as a requirement for my implementation.
Thanks,
Bryan
Leron IsCool says
What you didn’t show in the tutorial, how to restore from backup? I am noob in this
Leron Amin says
Check out this newly released tutorial for instructions on how to restore your website from a backup!
Bryan says
Hi,
The automated daily creation of snapshot worked but not the deletion. Those snapshots that are 7 days old were not deleted automatically. Can you help me on this?
Thanks,
Bryan
Leron Amin says
Hi Bryan,
Try adding the -d 7 flag to the script in your crontab and see if that fixes the issue:
Let me know if you have questions,
Joe
Sha says
Can you help with automating backups if my website is on a Windows instance?
Leron Amin says
Hi Sha,
I’m not the best resource for that, as I typically work in Linux environments. If you find a good solution, please share it, as other users may find it useful.
Thanks,
Joe
Mia says
Hi. I am getting a message that says invalid -e when I type the sudo crontab -e. I wonder why that happens.
Leron Amin says
Hi Mia – I’m not sure why that’s happening. Please copy and paste the error message and I will see if I can further assist.
Kapil Tiwari says
I am getting this on my log file .
/opt/google-compute-snapshot/gcloud-snapshot.sh: line 7: syntax error near unexpected token `newline’
/opt/google-compute-snapshot/gcloud-snapshot.sh: line 7: `’
Hassan says
Joe,
Thanks Joe for this great tutorial.
I was able to follow all your steps, including the testing part and it worked as you explained.
I have one question, If you please guide me how we can use these back up snapshot so we can create a new instance or revert to old instance with these backup if there is any wrongthing happed with our bitnami word-press instance. Please guide
Thanks and regards:
Hassan
Leron Amin says
Hi Hassan,
I will create a tutorial on the subject – thanks for the great suggestion!
Talk to you soon,
Joe
Gokul G says
Thanks for the tutorial.
Does GCP costs anything for this auto backups?
The pricing of GCP is little complicated for noobs like me.
Leron Amin says
Hi Gokul,
Yes – it’s not free. I just looked at an invoice from a Google Cloud billing account with 26GB of persistent disk snapshots – the total cost was $0.48/month (total price).
Remember, you’re billed by the storage resources consumed by your snapshots, not by the number of snapshots you have. For example, a single-page HTML/CSS website with no database could have 100’s of snapshots and it would only cost a couple of cents per month.
You can learn more about the cost of persistent disk snapshots here.
Hope this is helpful, and let me know if you have any questions,
Joe
Paker says
Thanks very much this is awesome thanks again
Riccardo says
Thank you, very good tutorial.
I have a question:
since my OS is a Debian Unix Server, do I need to install some other necessary packages before performing the procedure of this tutorial ?
For example I have to install the git package before, after checking that it is not installed (dpkg -l git) ?
https://github.com/Singular/Sources/wiki/Installation-from-GitHub-on-Debian
Leron Amin says
Hi Riccardo,
There’s no need to install Git or any other supplementary packages. The disk snapshot service is handled outside of your VM, so it will work regardless of your VM configuration.
Hope this answers your question,
Joe
Riccardo says
Great, thank you
FilmyDunia says
Hey Loren,
is it working for bitnami version of wordpress?
Thanks
Leron Amin says
Hi Filmy – This will work for either version of WordPress!
Joseph says
Hello,
Thank you very much for your tutorial, it helped me a lot.
I have a question, if I would like to do the same but in a Windows Server 2016 instance, what should I do?
Christian Andersen says
Thank you for a great tutorial! Really helpful.
I have a little question. First I made a manual snapshot from the GCP, size 2.75 GB, and afterwards I made a shapshot using your instructions here, size 56.75 MB.
Can you explain the size difference?
Thanks again.
Leron Amin says
Hi Christian,
The 1st snapshot contains the full backup, then the 2nd snapshot contains only the differences between the 1st and 2nd snapshot. This saves storage resources, and makes the process of creating/deleting/restoring snapshots a lot quicker.
You can read more about how snapshots work here.
Let me know if you have questions,
Joe
Bob says
Thank you very much for your effort!
Does taking snapshots and backups take money off my credit ? if it does how can I disable the backups ?
Leron Amin says
Hi Ibrahim,
The estimated cost for the snapshot configuration as described in the tutorial will be around $0.25 – $0.50 per month.
Disable the snapshot by opening your crontab file (from step 3), then delete the script that you added to the file, then save the file.
Hope this answers your question,
Joe
JL says
Hi
I followed the manual, and the backup was created, now, in case of disaster, how I restore the copy.
Leron Amin says
Hi JL,
Create a new instance using the snapshot as the boot disk. Then, switch the static IP address over to the new instance that was created from the snapshot. I go over the process in this tutorial.
As I mentioned, if you are restoring a snapshot in order to replace an existing instance, then it is important to assign the static IP address of the old instance to the new instance. You can re-assign the static IP address under VPC Network > External IP Address.
Let me know if you have any questions,
Joe
JL says
OK thanks
Anurag Tripathi says
thanks joe ,
its a great tutorial .
i have a question i want to set backup once in 7 days instead of daily . can you assist me ?
Leron Amin says
Hi Anurag,
If you want to set your backups to run every 7 days, then use the following script in step 3:
This will tell your crontab to run once per week on Sunday. Notice how the only change is that I added the 0 after 10 18 * *
Also, check out this crontab tool that you can use to schedule your crontab with even more precision.
Let me know if you have any questions,
Joe
Laszlo Kiss says
Hi, first of all lots of thanks for your excellent job! I managed to copy a WordPress site to Google Compute and it is running much faster than before. I also managed to do the automatic backup. I have two questions: 1. How regularly the automatic backup will run? 2. Our website has 43 articles, each with 1 picture, no videos, and the snapshot is 2.78. Is it not too big?
Leron Amin says
Hi Lazlo,
Thanks for the feedback!
In the tutorial, the backup is configured to run once per day.
Regarding the size of the backups – it shouldn’t be an issue. The first time you create a snapshot (backup), the entire contents of your disk are saved. Then, for every snapshot after that, only the changes to the disk since the initial snapshot are saved. For this reason, the snapshot files never take up too much space.
Check out the diagrams in the following links from Google Cloud to learn more about how snapshots are stored and deleted.
Hope this helps and let me know if you have any questions!
Benjamin Waller says
Thanks Joe for this great tutorial.
I was able to follow all your steps, including the testing part and it worked as you explained.
The only little bit of code that appears on this page, in the ‘Testing the automatic backup script’ section that was different from your tutorial was with the word ‘cat’ . See below.
Script on this page:
“`
sudo nano /var/log/cron/snapshot.log
“`
“`
Script in the tutorial
sudo cat /var/log/cron/snapshot.log
“`
Thank you very much for another fantastic tutorial.
Keep up the great work.
Best regards,
Ben
Leron Amin says
Hey Ben,
As always – thanks for the very valuable input!
I fixed the tutorial to represent the
catcommand.Thanks for all that you do to keep these tutorials up-to-date and error free!
Talk to you soon,
Joe
Benjamin Waller says
You are welcome Joe.
But you are the one who deserves the all the praise. You are providing an outstanding resource here and I thank you for being so generous with your time to respond to my questions I have even when those issue are sometimes outside of the scope of these tutorials. I can’t say enough about how much I appreciate you. I explored aspects of cloud computing that I would not have had the confidence to take on by myself. You have given me so much help I feel I should be offering you some sort of paying. In fact, would like to contribute a small donation of my appreciation if possible. Do you have a Paypal.me account (https://www.paypal.me/) or something similar so I can give you a token of my appreciation?
BTW. Super happy to see my daily snapshots of my Moodle instance in GCP! See screenshot.
https://drive.google.com/file/d/1u9qlYaf86GW5wJB6MbfphiGkbi6kl6pV/view?usp=sharing
Best regards,
Ben
Leron Amin says
Thanks Ben!
I appreciate your kind words, and I’m really glad to be of service!
And please – no donation is necessary. It makes me really happy to see that the automatic backups are working for you! It’s such a valuable tool, and hopefully the tutorial will become more popular over time.
Anyways thanks again for the kind words and for sharing the screenshot. Also, I appreciate you looking over the tutorial, as it’s impossible to catch all of the errors myself.
Talk to you soon!
Joe
Bob says
All went great! Thank you very much!
Leron Amin says
Thanks for the feedback – I’m glad to hear it worked for you!
Dali says
OMG, thank you, this is so useful!
Your tutorials are the best!
Leron Amin says
Thanks for the feedback Dali – I’m glad you found the tutorial useful! 🙂
Leron Amin says
What did you think of this tutorial?
Please share your questions and comments below!