For many application on Google Cloud, phpMyAdmin is only accessible via your local machine using an SSH tunnel. This is done as a security precaution, which you will find configured in the WordPress Bitnami stack on Google Cloud Platform.
In this tutorial you will learn how to use puTTY as an SSH client in order to establish a secure shell (SSH) connection between your server and your local machine. This secure connection will allow you to connect to your server’s phpMyAdmin page in order to safely make changes to your website’s database.
Before getting started with this tutorial, you should have already installed puTTY, which is the SSH client that you will be using in this tutorial. Also, you should have already launched an application on Google Cloud Platform, such as WordPress Bitnami, which will be used as the example in this tutorial.
There are 5 steps in this tutorial:
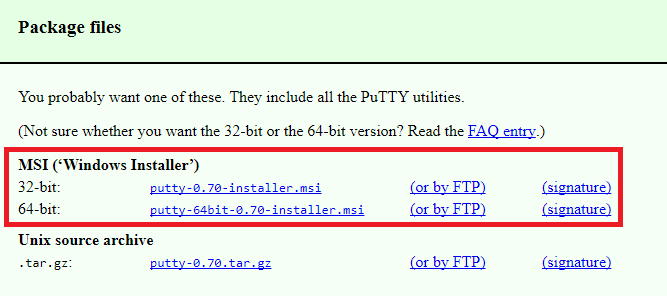
1. Download puTTY
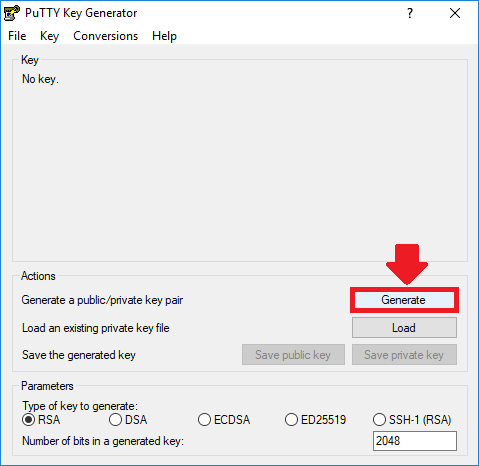
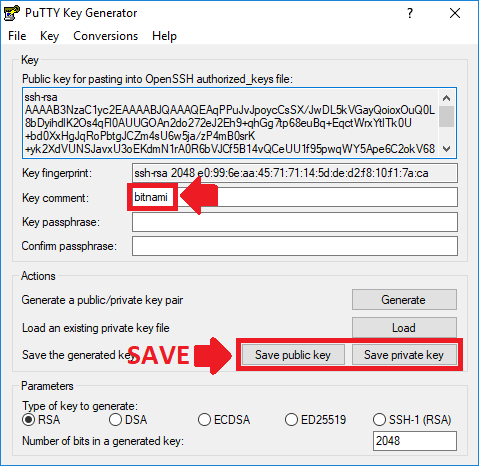
2. Generate SSH Keys
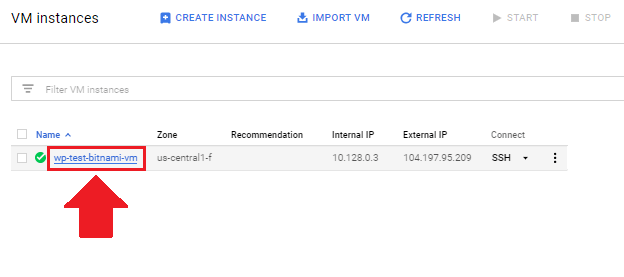
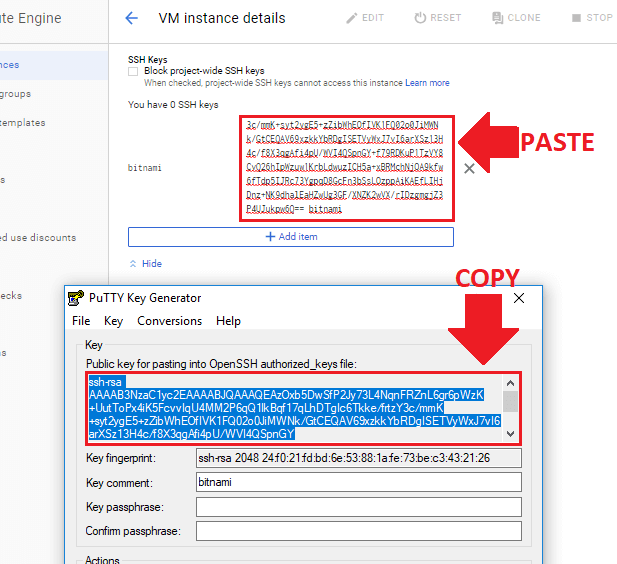
3. Configure Public Key
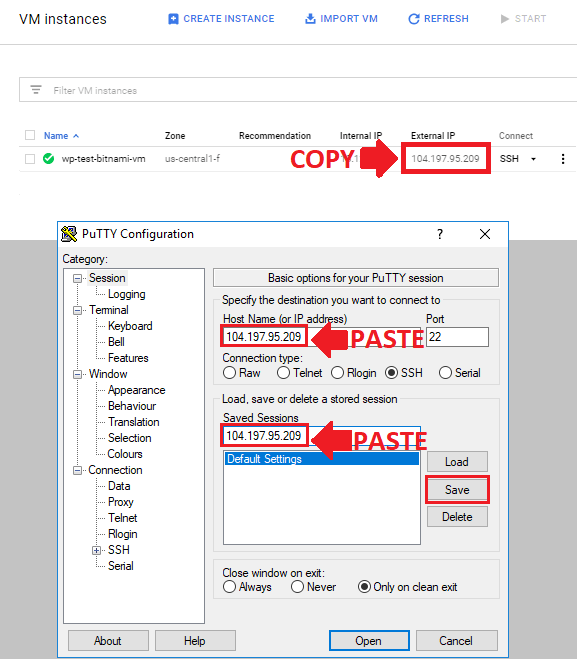
4. Configure puTTY Settings
4.1 Session settings
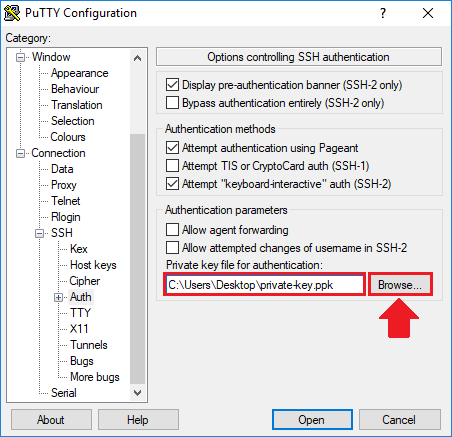
4.2 Auth settings
4.3 Tunnels settings
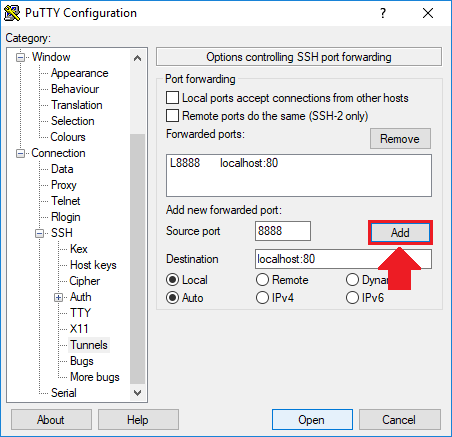
NOTE: If your domain is configured with SSL, then enter
localhost:443 as the Destination
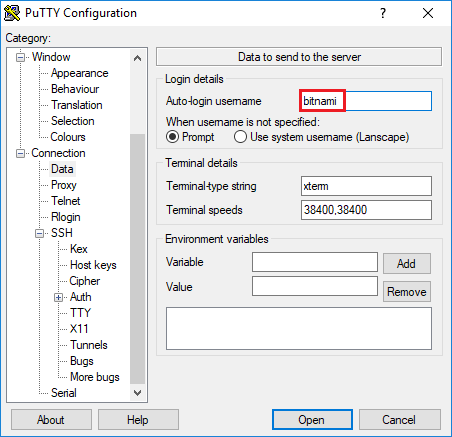
4.4 Data settings
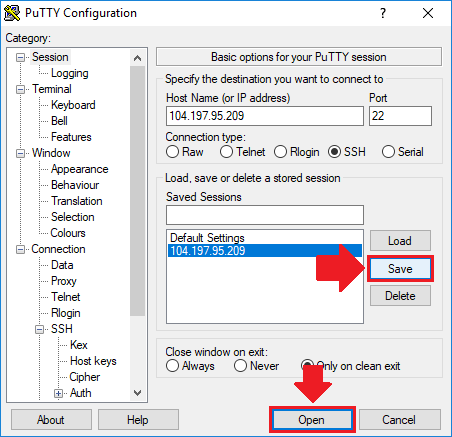
4.5 Session settings
5. Connect to phpMyAdmin

NOTE: If your domain is configured with SSL, then enter https://127.0.0.1:8888/phpmyadmin/ into the URL bar.
Did it work?
Now that you’ve configured the settings for both the puTTY Client and your Google Cloud VM instance, you can open the SSH tunnel at any time by clicking on the Open button on the Session page.
If you have any questions or comments, please post them below!
Thanks,
![]()
saurabh singh says
Hi ,
I am facing this issue
This site can’t be reached127.0.0.1 refused to connect.
Try:
Checking the connection
Checking the proxy and the firewall
ERR_CONNECTION_REFUSED
Leron Amin says
Hi Saurabh,
Ensure that you’re using the correct username, and that your firewall rules are allowing SSH traffic (port 22) to your VM instance.
Let me know if you have questions,
Joe
Prav says
Sir, can you please make a tutorial on how to protect the example.com/phpmyadmin URL by either blocking/redirecting it or putting it behind a username and password authentication.
I installed WordPress using Click to Deploy method and I followed some online tutorials which talk about making some changes to a configuration file in /etc/phpmyadmin directory.
But in my, case no such directory exists. All phpmyadmin files are located inside the /var/www/html/phpmyadmin folder.
The OS version is Debian 9.13, Apache 2.4.25 and phpMyAdmin 5.0.2. I installed using default Google Click to Deploy method.
Leron Amin says
Hi Prav,
That’s a good idea for a tutorial.
Essentially what you’ll want to do is to create a rule in your Apache Virtualhost configuration to allow/deny access based on IP. For example, you could only allow access from the IP of your home computer(s). Check out this thread for additional information.
Let me know if you have other questions,
Joe
gunawardhana says
hello sir
my wordpress site has been hacked now it redirect to other sites.i want to backup my database through phpmyadmin before attack i access phpmyadmin via shh but now i cannot, it put this URL is only accessible using localhost (127.0.0.1) as the hostname. what i can do for this issue please kindly help me to get rid of this
Leron Amin says
Hi Gunawardhana,
With Bitnami’s WordPress solution, phpMyAdmin is only accessible via SSH tunnel. I created this tutorial with instructions.
Let me know if you have other questions,
Joe
Shashwat Srivastava says
For security reasons, this URL is only accessible using localhost (127.0.0.1) as the hostname. this error shows when I want to access myphpadmin. How can I solve this? plz help me
Leron Amin says
Hi Shashwat,
This indicates that your SSH tunnel isn’t configured properly, as the connection between your local machine and your server couldn’t be established.
You’ll have to go through the steps of the tutorial again to make sure everything is configured properly.
Let me know if you have questions,
Joe
Awais Ahmad says
hello sir thx for the tutorial. It was so helplul. i am running a wordpress multisite bitnami on google cloud platform by following your tutorials and i got a problem which is i am unable to access phpmyadmin through this link https://127.0.0.1:8888/phpmyadmin/ as i see the following error
“phpMyAdmin – Error
Wrong permissions on configuration file, should not be world writable!”
can you help me what commnad should i use to on ssh terminal to fix the issue and to get the access of phpmyadmin login
thanks
Leron Amin says
Hi Awais,
You need to make your config.inc.php file writable. To do so, run the following command:
Also, check out this resource for additional information.
Let me know if you have other questions,
Joe
Amer says
Hello, how to do this and access phpMyAdmin when i have : Azure : WordPress certified by bitnami ? Not Google cloud platform ?
Leron Amin says
Hi Amer,
It’s essentially the same process – but if you’d like, check out the instructions from the Bitnami documentation here.
Let me know if you have questions,
Joe
George says
Hey used your tutorial to connect to phpmyadmin from GCP but Im not able to
A white screen with this message comes up
This site can’t be reached127.0.0.1 took too long to respond.
Try:
Checking the connection
Checking the proxy and the firewall
ERR_TIMED_OUT
what can be the cause?
Leron Amin says
Hi George,
This sounds like a firewall issue. Make sure that you have a firewall rule enabled to allow SSH traffic to your VM instance (port 22).
Check out this page of the Google Cloud documentation for additional information on configuring firewall rules.
Talk to you soon,
Joe
shahbaaz says
Your Tutorial saved me and my website like the 10th time. Thank you so much! My site was infected with a malicious post that didn’t show up in the posts section or to any admin. So I had to manually delete it from PHP myadmin.
Leron Amin says
Thanks for the feedback Shabaaz – sorry to hear about the malicious post!
Oyola says
Your website is really helpful and you are really doing great job here.
My question is: how do I change PHPmyadmin link to a custom link so that only me can access it. For example, anyone that type “site-domain/phpmyadmin” can have access to see the PHPmyadmin page.
Leron Amin says
Hi Oyola,
This is a common question, and there are numerous tutorials which you can find by doing a Google search.
For example, check out this article.
Let me know if you have questions,
Joe
Hisenberg says
“This site can’t be reachedlocalhost refused to connect.
Try:
Checking the connection
Checking the proxy and the firewall
ERR_CONNECTION_REFUSED”
this the error message after successful connection with putty.
I used http://127.0.0.1:8888/phpmyadmin/ to access but unable access phpmyadmin.
Leron Amin says
Hi Hisenberg,
Do you have a firewall rule configured to allow SSH traffic to your VM on port 22?
This is the first thing I would check, given the connection refused error.
Check out this link for instructions to allow traffic on port 22, and let me know if you have any questions.
Talk to you soon,
Joe
Hisenberg says
Please let me know how to do this.
Leron Amin says
Hi Hisenberg,
First navigate to Networking > VPC Network > Firewall Rules. From here, observe the list of firewall rules and look for a rule with a name of “default-allow-ssh” with a target of “Apply to All”. This would indicate that a firewall rule is enabled to allow ssh traffic to your instance. If you don’t see that firewall rule, check for another firewall rule allowing SSH traffic (look at rows with tcp:22 in the Protocols/ports column).
If an SSH rule doesn’t yet exist for tcp:22, then you will need to create one.
Let me know if you what you find, and if needed, I will tell you how to create the firewall rule.
Talk to you soon,
Joe
DJ says
Hi ,
I used this method and it says ‘the connection was reset ‘. Please help.
Yash sharma says
Hi
this site can’t be reached
Checking the connection
Checking the proxy and the firewall
ERR_CONNECTION_REFUSED
“Website and phpmyadmin same error” please help out website host on google cloud server.
thanks
Yash
Leron Amin says
Hi Yash,
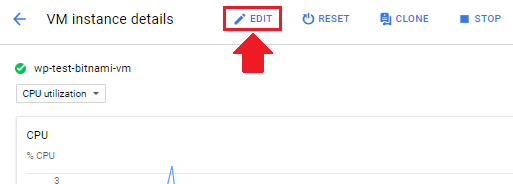
Go to Compute Engine, then click on your VM instance then click on the ‘Edit’ button. Scroll down the settings page for your VM instance and make sure that the boxes are checked for ‘Allow HTTP traffic’ and ‘Allow HTTPS traffic’.
Once you’ve checked these boxes, scroll to the bottom of the page, save changes, and try accessing your website again.
Let me know if you have any other questions,
Joe
Arman ali says
Hey Leron Sir,
I am not using bitnami in GCP i am using ZesleCP (basically a simple control panel) but i want to access phpmyadmin through SSH tunnel but with this method it is not working. look at the screenshot (https://ibb.co/p3vyrs7) so please tell me what should i do? To access phpmyadmin through SSH tunnel. Please help me.
Thanks
Leron Amin says
Hi Arman,
If you’re using ZesleCP, can’t you access phpMyAdmin directly from the dashboard? Did you already restrict phpMyAdmin access via http? Are there already security configurations in place (through ZesleCP) to prevent malicious actors from accessing phpMyAdmin?
These are all questions I would ask myself before attempting to configure the SSH tunnel.
Anyways, let me know if you’re able to get it working!
Talk to you soon,
Joe
Edward Kam says
Apologies if this had been covered. The message below come to being during connecting phpmyadmin via https. I have to manually click on the link at “Proceed to 127.0.0.1 (unsafe)”. Is this normal? Anyway to mitigate this please. Thanks.
“Your connection is not private
Attackers might be trying to steal your information from 127.0.0.1 (for example, passwords, messages, or credit cards). Learn more
NET::ERR_CERT_COMMON_NAME_INVALID
This server could not prove that it is 127.0.0.1; its security certificate is from site.com. This may be caused by a misconfiguration or an attacker intercepting your connection.
Proceed to 127.0.0.1 (unsafe)”
Edward Kam says
It’s ok. It seemed fine after I disbaled some settings in my browser.
Pronay Sarkar says
I am trying to open phpmyadmin with your method but doesn’t working.
Everytime sows that “For security reasons, this URL is only accessible using localhost (127.0.0.1) as the hostname.”
My Site is https://www.wpthemeinc.com/
hosted on google Cloud.
Please help me.
Leron Amin says
Hi Pronay,
What did you use as the hostname?
Try using localhost or 127.0.0.1 as the hostname, and it should work.
Let me know if you have questions,
Joe
assad says
Thankss mann… it has been like 48 hours i am looking for solution and couldn’t sleep…. really great full, You solved my problem stay blessed.. You are true champpp …
Jitu says
How do I find out my Google cloud hosting website version of PHP. Can I change version of php?
Leron Amin says
Hi Jitu,
You can check your PHP version by executing the following command:
php -vLet me know which version of WordPress on Google Cloud that you’re using, and I will provide instructions.
Talk to you soon,
Joe
Enes says
Hi, i’m runing wordpress site on gcp (click to deploy). In wordpress, when i go tools-site health it show me critical error: your php version need update. I checked via ssh my current version and it say v7.0.33. I’m confused now, i thougt this v7.x is latest php version. So can you please explain if there is newer version how to update. Can you do tutorial about that?
Leron Amin says
Hi Enes,
The lastest version of php is 7.3.
The instructions for upgrading PHP are dependent on your operating system. For instance, run the following command to check your operating system:
Next, do a search for tutorials on how to upgrade PHP on whichever operating system you’re running.
Hope this helps, and let me know if you have any questions,
Joe
Noer Loekman says
Great tutorial. But how did I know the username and password of myphpadmin?
Thanks
Leron Amin says
Hi Noer,
The password is generated when you first launch the WordPress instance.
On Google Cloud, you can view the phpMyAdmin credentials by navigating to Marketplace > Your Solutions. From there, click on the WordPress instance that you deployed in order to show the phpMyAdmin username and password.
Hope this helps and let me know if you have any questions,
Joe
Akash Sarawagi says
thanks buddy for your help. 🙂
Well your tutorials are really very very helpful for beginners .
I am using bitnami wordpress as vm instance in google cloud. I used then putty and did the all required steps as mentioned in tutorial. I was successfully able to access phpmyadmin.
But after installing ssl. when ever i try to access http://127.0.0.1:8888/phpmyadmin/index.php it redirects to my domain and i get error message saying “For security reasons, this URL is only accessible using localhost (127.0.0.1) as the hostname.”
Kindy help me
Leron Amin says
Hi Akash,
If you’re using SSL, you will have to use https://127.0.0.1:8888 instead of http://127.0.0.1:8888
Check out this comment here from Georgi where he goes into detail about the process!
Let me know if you have any questions,
Joe
BIJAY says
i am getting redirected to the site url whenever i am accessing it through localhost please help me
Leron Amin says
Hi Bijay,
Try accessing the site through another browser aside from Google Chrome.
If that’s not an option, try viewing the site through a private window.
If it still doesn’t work, please provide additional details of the errors you’re experiencing and I will see how I can help.
Joe
Rudy Hettrick says
Hi Joe,
Thank you so much for all your wonderful tutorials. I’m running a multisite (Click to Deploy)right now and crashed the site because I changed the domain to https before running certs first. I think that’s what happened. LOL! Anyways, I’m trying to open phpmyadmin, I can login to Apache fine by following the above instructions, but I still can’t connect to phpmyadmin, trying both http an https to login. The instance details do not show a phpmyadmin user or password either. So I’m not sure what to do next. If there’s another way even, to revert my domain back to http:// for now, then I am open to options. Thanks!! 🙂
Leron Amin says
Hey Rudy,
Thanks for the feedback – I’m glad the tutorials were helpful to you! 🙂
Comment out (aka put a # to the very left of the text) the redirect from your wordpress.conf file (step 7) and also temporarily undo what was done in step 6 (comment out the SSL certs, and uncomment the snakeoil certs).
Then, follow the section from this guide in the section titled ‘Edit functions.php’, add add your WordPress URL without https. Save the changes and restart your server. Then try viewing your site in a different browser or through a proxy, as your default browser will try to serve the cached page with the https prefix.
Hope this helps and let me know if you have any questions,
Joe
Rudy Hettrick says
Hi Joe! Thanks for your help. I ended up relaunching a new Click To Deploy Multisite instance. I pointed my Godaddy Domain to GC and changed the url in the settings and now the site is down and I still can’t access PHPMyAdmin for some reason. I followed the instructions I’m pretty sure. I just don’t know why I can’t. I enabled FTP permissions and have access there. Just no access to phpmyadmin. What am I missing?
Leron Amin says
Hi Rudy,
It looks like the site is up (primarlweb.ca), but the /phpmyadmin URL is returning a not found.
Did you remember to check the box “Install phpmyadmin” when you deployed the instance?
Talk to you soon,
Joe
Duy Anh says
Hi, Thank you for your guide. I want to ask how i can update php version to 7.1 in Google Cloud ?
Thank you for your help
Leron Amin says
Hi Duy,
I wouldn’t recommend doing the upgrade unless you are an experienced sysadmin – so proceed at your own risk and with caution.
If you’re using Bitnami, you will most likely have to deploy a new WordPress LAMP stack with the upgraded components and migrate your website manually or with the All-in-One WP Migration plugin.
If you’re using Click-to-deploy or a similar Apache configuration, you can upgrade the components manually. Check out the following resources from Ayesh, and LinuxTechLab.
Remember to create backups of your website before making any changes.
Best of luck,
Joe
Ekaluk Pongsrihadulchai says
after I reached http://127.0.0.1:8888/phpmyadmin/
It showed me the red screen with error below. could you help ?
Error during session start; please check your PHP and/or webserver log file and configure your PHP installation properly. Also ensure that cookies are enabled in your browser.
session_write_close(): write failed: No space left on device (28)
session_write_close(): Failed to write session data (files). Please verify that the current setting of session.save_path is correct (/opt/bitnami/php/tmp)
Leron Amin says
Hi Ekaluk,
One of your directories is full, and therefor can’t be written to.
In your terminal, run the following command to view which directory is full:
You will have to increase the size of the disk in order to be able to write to it. Unfortunately, I don’t have a tutorial on that subject, but you can check the Google Cloud docs for instructions on how to resize persistent disks.
The resizing process, as documented in the link above, is a relatively straightforward process; however, it requires that you stop your instance.Make sure that you reserve a static IP address for your VM instance before stopping it.
Hope this helps and let me know if you have any questions,
Joe
Vincent says
I am using an online server,can I use this tutorial?
Leron Amin says
Hi Vincent,
Yes, you can. However, with most applications you can access phpMyAdmin directly at yourwebsite.com/phpmyadmin – therefor there is no need to implement the steps outlined in this tutorial. That being said, if you’re using one of Bitnami’s stacks then you will indeed find this tutorial useful for your online server.
Let me know if you have any questions,
Joe
Vincent says
I am using phpmyadmin on my server,I need to connect the database with google cloud server,I don’t know the steps or how everything supposed turned to work,I have been stuck for 2 weeks and I cant find any clear tutorial on exactly on what to do…
Leron Amin says
Hi Vincent,
Which application are you running? WordPress?
If so, I would avoid using Bitnami’s stacks and instead use Click-to-deploy stacks because they are easier to configure. Using Click-to-deploy will allow you to access phpMyAdmin directly from your website’s url (yourwebsite.com/phpmyadmin).
Hope this helps and let me know if you have any questions,
Joe
Vincent says
Its just a normal website with an online database and I need to connect the database with google cloup plartform.
Leron Amin says
Hi Vincent,
This tutorial is not related to what you are trying to accomplish, and I don’t have any tutorials on the subject.
Your database credentials are stored in a configuration file, which will be different depending on the application stack that you’re running.
This Magento tutorial gives an overview of the general process (for Magento specifically), but like I said, the steps will be different depending on your application stack.
Good luck and I hope this information helps,
Joe
Bob says
Thanks! All went great!
however now am phpmyadmin, what’s the user name and password supposed to be ?
Leron Amin says
Hi Bob,
Your username and password credentials for phpMyAdmin are created when you first launch the instance. You can view them from your Google Cloud dashboard by clicking the hamburger menu in the upper-left hand corner of the screen and navigating to Cloud Launcher > Your Solutions and then selecting your deployment.
Let me know if you have any questions,
Joe
C.L. says
Hi Joe,
Once again your tutorial has been great and me without having any knowledge and background in this field has managed to successfully reach phpmyadmin page.
However, i also faced the same situation whereby i dont know how to log on. Googled and watched YouTube and there seems to be tons of solutions like username=root, password=null, when that didnt work, change the config.inc.php to no password etc., but all these still did not work out. Saw this thread and looked into Google Cloud dashboard, but there isnnt this Cloud Launcher option available. Can you please shed some lights on this? Thanks!
Leron Amin says
Hi C.L.,
From the Google Cloud sidebar menu, navigate to Marketplace > Your Solutions, then click on the deployment for your application. This will show you a dashboard with your phpmyadmin username and password.
Let me know if you have any questions,
Joe
C.L. says
Hi Joe,
Thanks again, managed to locate the dashboard. However, keyed in the admin user and admin password (temporary), still got this message “mysqli_real_connect(): (HY000/1045): Access denied for user ‘user’@’localhost’ (using password: YES) ”
and noticed that the site address and admin URL do not show my wordpress URL, but both are showing exclamation mark in red instead
C.L. says
Hi again Joe,
Again, just moments after submitting my last reply, i’ve managed to find the solution, simply by using “root” as the username instead of “user” as what showed on the Google Cloud dashboard, and using the same admin password (temporary).
Thanks again so much!
Leron Amin says
I’m glad to hear you got it working – and thanks for sharing the solution!
Crystal says
Just wanted to thank you for all the work you have put into this site. I am in the process of building and launching my business website using Bitnami WordPress on the gcp and I have you to thank for getting me this far. You have the single best, most complete start to finish walkthrough for someone like me that knew absolutely nothing at the start of this endeavor. Whenever I googled how to do something your site came up again and again, with exactly what I needed, presented in a way that is easily understood. I eventually just pinned your site in my browser to save time. My site is up, working correctly with the correct domain, my theme is installed and my dummy data is plugged in. I’m all set to customize the site and input my own content. You deserve an awesomeness award for sure!
Leron Amin says
Thanks so much for the positive feedback Crystal – I love hearing stories from people who were successful in migrating their websites to the cloud.
Don’t hesitate to reach out if you ever have any questions or comments related to any of the tutorials! 🙂
Talk to you soon,
Joe
Anton says
Thanks for this great tutorial!!
though at first it stressed me out because whenever I access local:8888/phpmyadmin I always redirected to home page of the actual site. and all the tips in the comment section didn’t worked for me. I use SSL on my site by the way.
But I finally can now access phpmyadmin by excluding phpmyadmin from force always HTTPS.
and then I can access phpmyadmin with port 80, while my site still always HTTPS.
Leron Amin says
Awesome – sounds like a great workaround! Thanks for sharing the details!
tse says
Dear Leron,
Thank you for the great tutorial, it helps me a lot.
However, i would like to ask 1 question that i want to upload my themes / plugins through Filezilla, and where should i locate the themes / plugins file?
thanks
Leron Amin says
Hi Tse,
I’m glad the tutorial helped you!
For the Bitnami stack, the directory is located at /apps/wordpress/htdocs/wp-content
For Click-to-Deploy, the directory is located at /var/www/html/wp-content
Let me know if you have any questions,
Joe
Geoff says
I have configured the install (Bitnami WP) to use a URL instead of the IP, and have the free SSL enabled (your tutorials – great resource!!!), and when I try to tunnel in, it redirects to the URL, not 127.0.0.1. Any advice on getting that redirect to be avoided?
Leron Amin says
Hi Geoff,
I’m not sure how to get that working. You’re not the first person to complain of that issue, but I’m also not sure how they got it resolved.
My advice would be to check StackOverflow and try contacting Bitnami support to see if they can help since the issue seems to be unique to their WordPress stack.
Please let me know if you find the solution.
Thanks,
Joe
Geoff says
Found it – if you set up the connection in Terminal using ssh -N -L 8888:127.0.0.1:443 -i ~/.ssh/wherever/keyfile name@[my ip address] then connect to https://127.0.0.1:8888/phpmyadmin/ it seems to be able to bypass the IP redirect.
Leron Amin says
Hi Geoff,
Thanks for finding this solution – I know a lot of users will find it helpful!
Best regards,
Joe
Isabel Da Guerra says
Hiya again, 😉
I was determined to set up my PHPAdmin… Followed your steps but still got access error. But eventually managed between your tutorial AND bitnami’s …
—————Kept getting this WARNING MESSAGE——————
“Your connection is not private
Attackers might be trying to steal your information from 127.0.0.1 (for example, passwords, messages or credit cards). Learn more
NET::ERR_CERT_COMMON_NAME_INVALID”
————————————————
>> Clicked on the ‘Not Secure’ on —-Chrome browser—- and read ‘Certificate Invalid’ ???
…but test on https://www.ssllabs.com/ssltest/ passed with ‘A’ level ???
Talk about being confused huh!? HeLp 😉
>> Clicked on the ‘Learn more’ in —-WARNING MESSAGE—-
Long story short, it said my site was not secure but I could still click on… ‘Proceed to 127.0.0.1 (unsafe)’ and voila’ got to unsecure https://127.0.0.1:8888/phpmyadmin/
Next step >> Login
Now not sure but, I could’ve used the ‘mysql -u root -p’ command for this to have worked a couple months back… as seen at ‘How To Connect To The MySQL Database?’
https://docs.bitnami.com/google/apps/wordpress/#how-to-force-https-redirection
PROBLEM: Login to PHPAdmin ‘bitnami’ username was not accepted,
FIXES: As per instruction on VIDEO link below – username ‘root’ and ‘password inside my VM instance’ was accepted.
https://docs.bitnami.com/google/apps/wordpress/#accessing-phpmyadmin-on-windows
————————————————-
I have a question though, with regards to:
This server could not prove that it is 127.0.0.1; its security certificate is from mysite .com. This may be caused by a misconfiguration or an attacker intercepting your connection. Proceed to 127.0.0.1 (unsafe)
Is there anything I should be worried about or is there any alternative fixes for this?
Thank you again 😉
Leron Amin says
Hi Isabel,
Just choose the option for “trust anyway” – it will not pose a security issue.
This is because you are accessing your website’s back-end through localhost, so there is no third party validating the authenticity of the certificate.
Isabel Da Guerra says
Thank you Leron, understood and at easy … 😉
Dev says
Thank you for the great tutorial Leron. I would like to adapt this solution for those who connect to phpmyadmin on macOS or Linux. Once you have the keys Just open terminal and
If you are not using SSL use following code:
ssh -N -L 8888:127.0.0.1:80 -i [paste path to key file .pem] bitnami@[paste your ip address.]
and go to http://127.0.0.1:8888/phpmyadmin/
If you are using SSL use following code:
ssh -N -L 8888:127.0.0.1:443 -i [paste path to key file .pem] bitnami@[paste your ip address.]
and go to https://127.0.0.1:8888/phpmyadmin/
Leron Amin says
Hi Dev,
Thanks so much for sharing this!
A lot of people have been asking about how to adapt this tutorial for Mac, so I will point them to your comment!
Talk to you soon,
Joe
Benjamin says
Hello Dev,
I have tried this but doesn’t work; nothing happens after I get prompted to enter my passphrase as follows:
Enter passphrase for key ‘/home/benjaminwaller/.ssh/google_compute_engine’:
It enters to the next line and just sits there!
I thought it might have been because I had the firewall check on in my GCP instance but I turned it off and still can’t connect!
I used this the following command without the ‘.pem’ because I got an “No such file or directory.
Permission denied (publickey). error when adding that.
ssh -N -L 8888:127.0.0.1:443 -i ~/.ssh/google_compute_engine benjaminwaller@[my ip address.]
The permissions is set to the highest at 775.
Can anyone suggest someone I’m missing?
Best regards,
Ben
Benjamin Waller says
UPDATE: I figured this out.
I needed to create the SSH tunnel after doing gcloud auth login. I was SSH’ing into my vm with this command (gcloud compute ssh moodle-1-vm –zone australia-southeast1-a) and then trying to SSH to my machine while connected via SSH. I found out after sharing a screenshot of my terminal commands on the Bitnami Community forum https://community.bitnami.com/
Just wanted to share my issue and solution for others with little experience like me.
Best regards,
Ben
Leron Amin says
Awesome! Thanks for sharing the update Ben! 🙂
Georgi says
Hi Leron
here how I fixed:
L8888 localhost:443 or L8888 127.0.0.1:443 instead of L8888 127.0.0.1:80
and then
https://127.0.0.1:8888 instead of http://127.0.0.1:8888
and all is working.
Thank you for your very helpful work!
Best regards
Leron Amin says
Hi Georgi,
Thanks for posting this! 😀
These are very great tips for people configuring SSH tunnels with SSL configured!
Talk to you soon,
Joe
Leron Amin says
Did this tutorial work for you?
Please share your questions and comments below! 😀