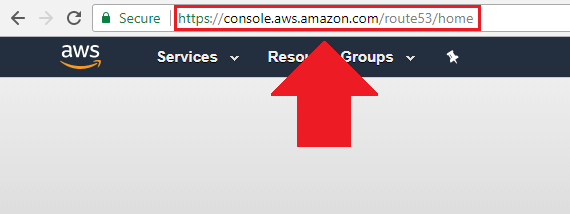
After you’ve installed an application such as WordPress on Amazon’s AWS, the next step is to transfer your domain name to AWS so that it links to your website.
Taking the time to properly configure a domain name for your website is an easy way to prevent search engine indexing issues from occurring.
By default, your public IP address will be used as the domain for your website. However, using a public IP address as your primary domain is bad for your website’s SEO.
If you would rather use a custom domain name such as yourwebsite.com, then read on for instructions on how to transfer your domain to AWS.
Before getting started with this tutorial, you should have already installed an application such as WordPress on an Amazon AWS EC2 virtual machine instance.
There are 7 steps in this tutorial:
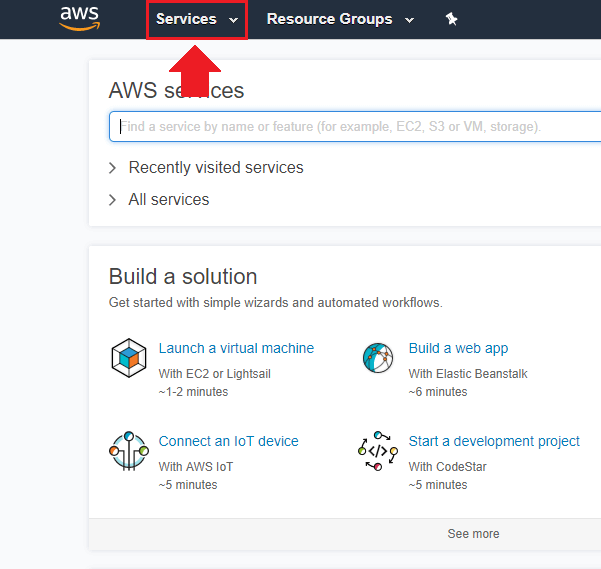
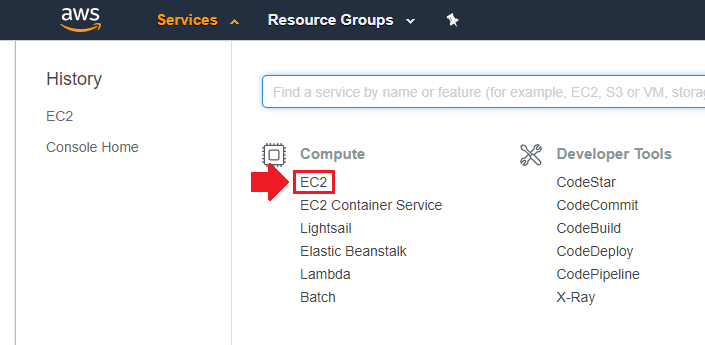
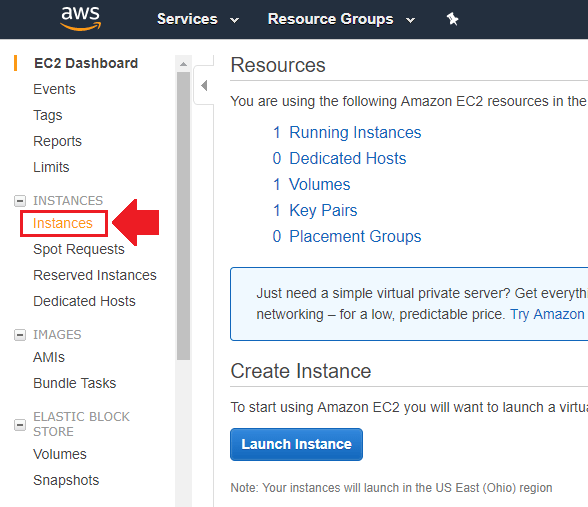
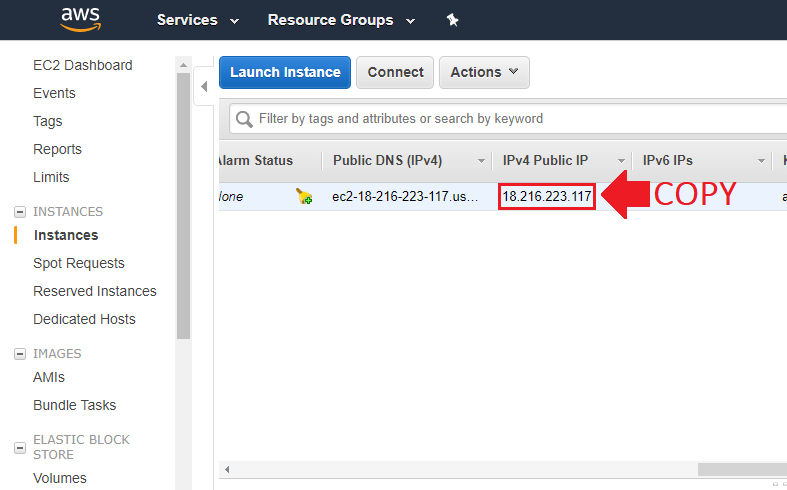
1. Copy Virtual Machine IP
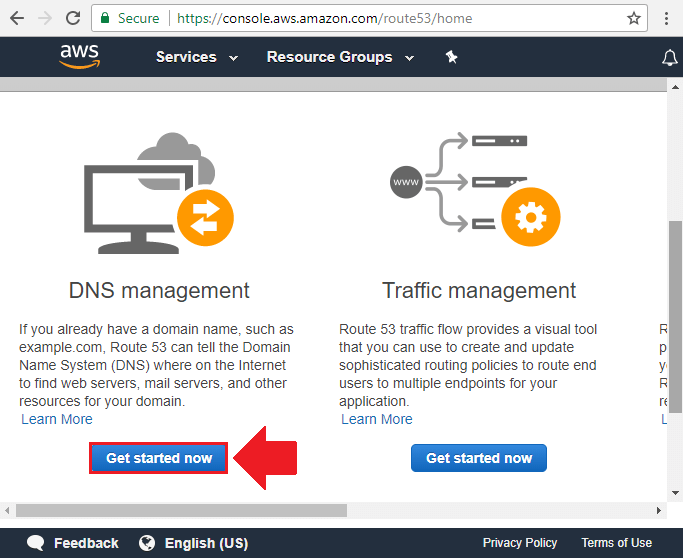
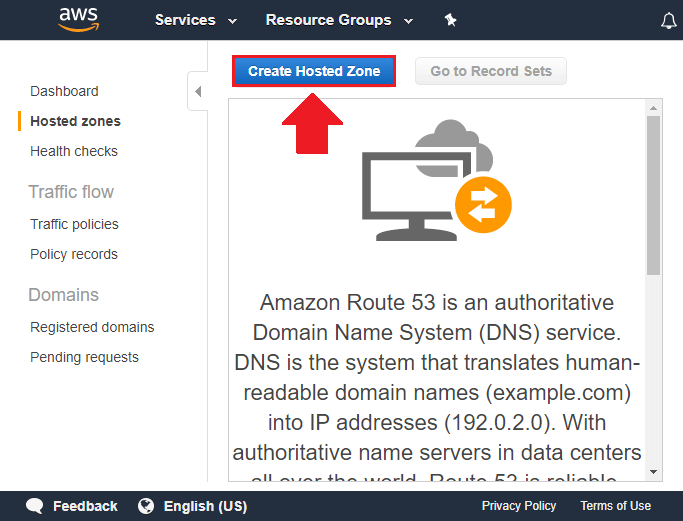
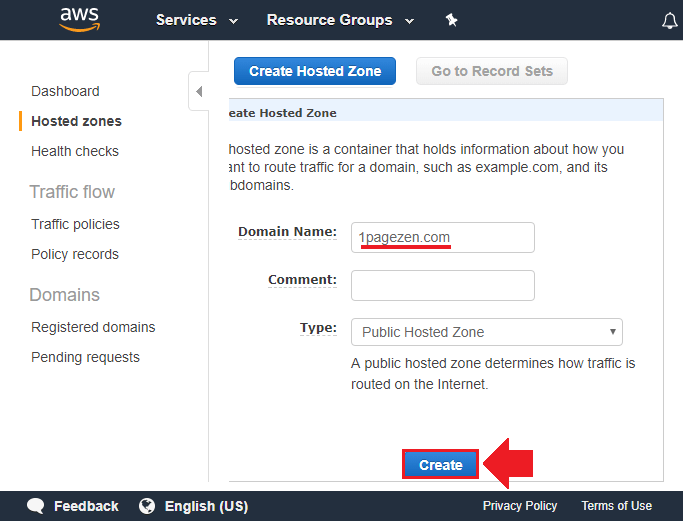
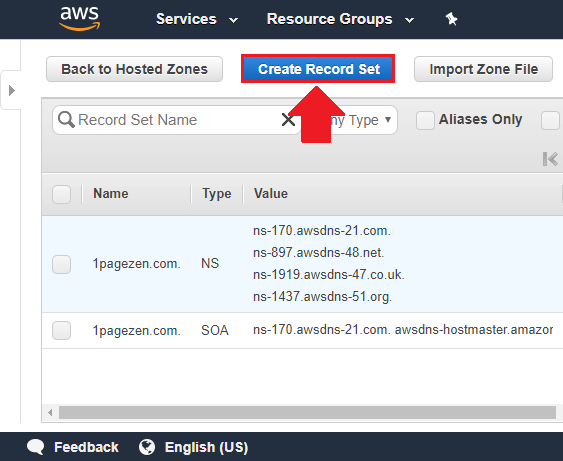
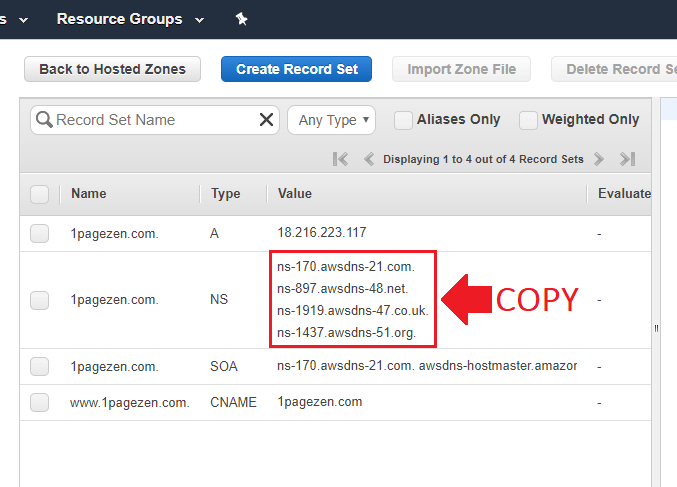
2. Create a Hosted Zone
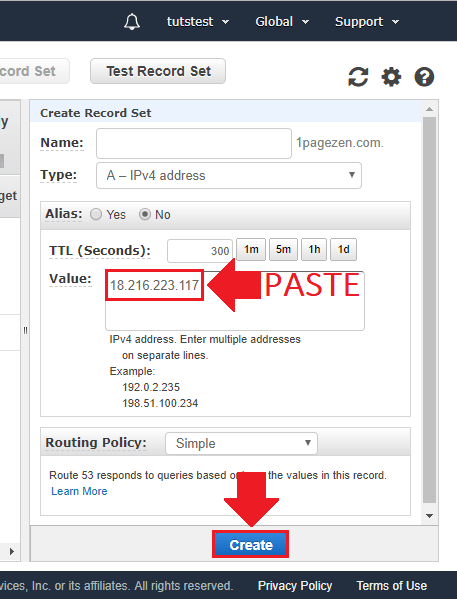
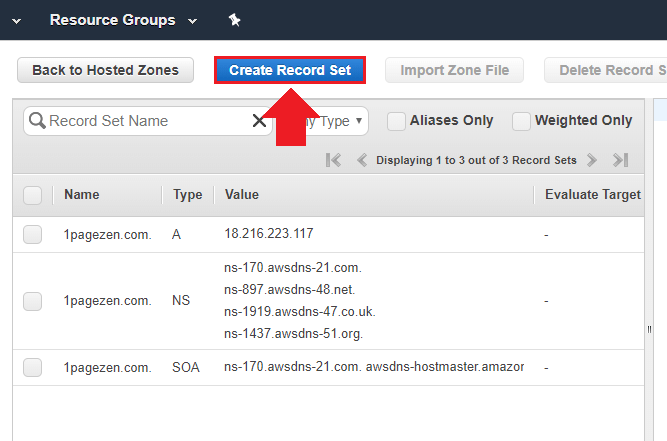
3. Add “A” Record
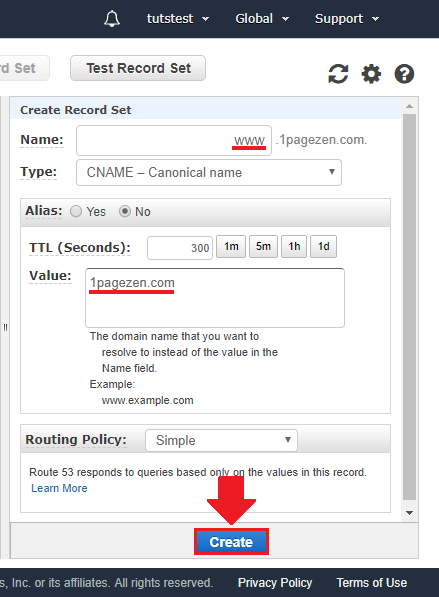
4. Add “CNAME” Record
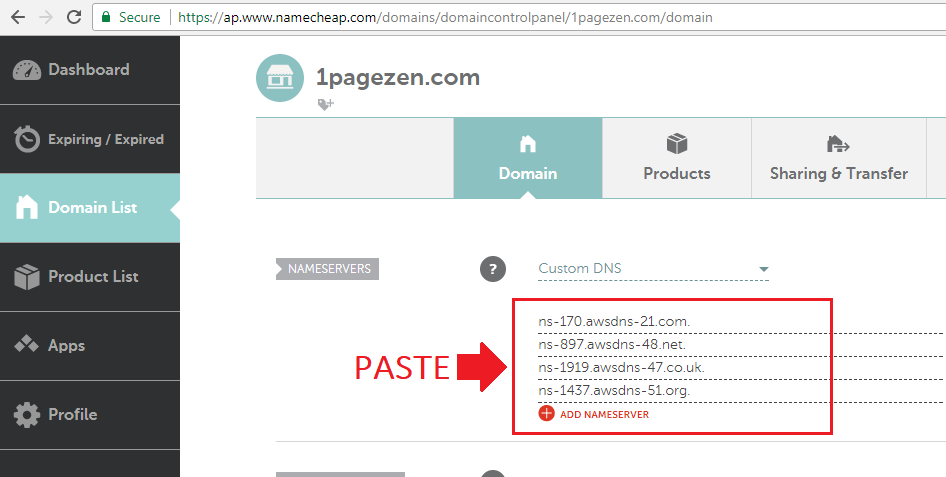
5. Edit Domain Name Servers
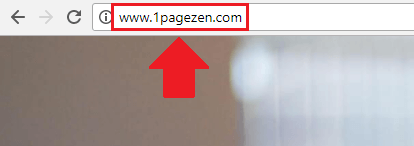
6. Test Settings
7. Include www. Prefix (Optional)
By default, your domain will show without the www. prefix.
If you would rather your domain show up as www.example.com instead of just example.com, then read on for configuration instructions.
NOTE: The instructions below are intended for users running Bitnami’s WordPress stack on AWS. If you’re using a different Apache configuration, remember to substitute the bitnami.conf file with your server’s htaccess equivalent.
In order to add the www. prefix to your domain, you will first need to configure an SSH client to connect to your EC2 instance. To learn how to SSH into your EC2 instance, check out How to SSH into EC2 Instance (AWS).
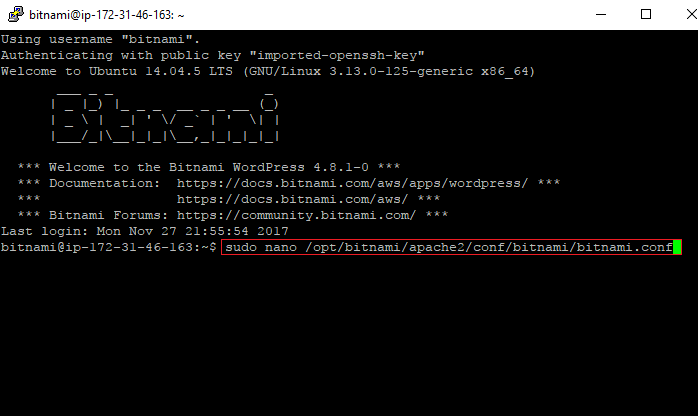
sudo nano /opt/bitnami/apache2/conf/bitnami/bitnami.conf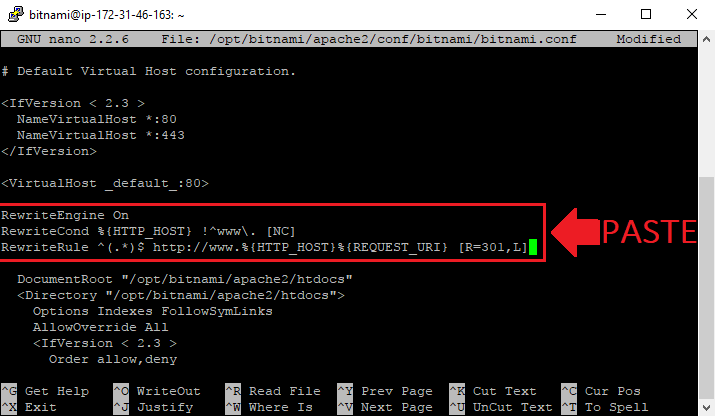
  RewriteEngine On
  RewriteCond %{HTTP_HOST} !^www\. [NC]
  RewriteRule ^(.*)$ http://www.%{HTTP_HOST}%{REQUEST_URI} [R=301,L]
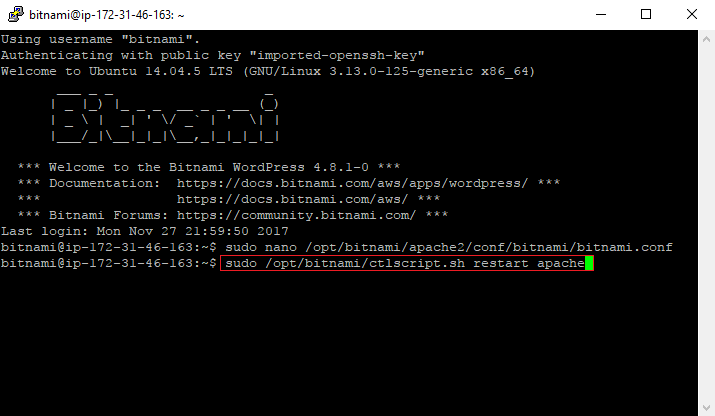
sudo /opt/bitnami/ctlscript.sh restart apacheDid it work?
If you have general questions or comments about this tutorial, please feel free to leave them below.
If you benefited from this tutorial, and would like to support One Page Zen, please like our Facebook page and subscribe to our YouTube channel.
Thanks,
![]()
Leah-Kim Revel says
This is great- but what if I don’t want the ‘www.’? How can I make it only for the domain lacking the ‘www.’?
Leron Amin says
Hi Leah-Kim,
You would set the preferred version of your domain name under WordPress Settings > General.
You should also configure a redirect in your Apache configuration. I go over what an example redirect would like in step 4 of this tutorial.
Let me know if you have other questions,
Joe
Ti says
Thanks a lot I connected a domain to AWS Lightsail with your guide. Thank you very much.
Leron Amin says
Thanks for the feedback Ti – glad to hear the guide was helpful!
dan says
Hey Joe
Thanks for all the tutorials really helped me with running my site.
do you have a tutorial about implementing an SSL certificate with aws on wordpress?
that would be so helpful
Leron Amin says
Hey Dan,
Thanks for the feedback!
I don’t have an SSL tutorial for AWS at the moment – but I have received a lot of requests. Stay tuned!
Talk to you soon,
Joe
Jyoti says
Hi Leron,
Great tutorial!
I am having trouble with finding appropriate config file to tweak “www” part. I am not using Bitnami, instead I have Apache+mysql+php installed on my AWS EC2 instance and for now I am just using index.html located in /var/www/html/. Do you have any idea ?
Thanks for help!
Leron Amin says
Hi Jyoti,
Your Apache configuration files are located in the following location:
/etc/apache2/sites-available/Navigate to this location, and add the directives to your apache2.conf file.
Let me know if you have questions,
Joe
Jyoti says
Great! Thanks Joe.
David C says
Thanks for the tutorial.
How do I manage my Google domain to point to EC2 website without using AWS Route 53?
Leron Amin says
Hi David,
You can visit your domain registrar and create an A record with the IP address of your VM instance.
Try following the instructions in this guide here, minus the last step.
Let me know if you have questions,
Joe
sean says
Howdy! This is a great tutorial however it needs an update. Please update!
Leron Amin says
Thanks for the information Sean – I will update the tutorial!
Sapam.S says
can you add a bit more on how to add an elastic ip with our hosting? My site went down after i attatched an elastic ip. Some help
TJ says
This doesn’t work anymore.
Leron Amin says
Hi TJ,
Please provide additional details as to why it doesn’t work anymore, and I will look into updating the tutorial.
Thanks,
Joe
Mike says
Can you please put up an article on How to log into phpmyadmin page especially for Bitnami stack? You have to “tunnel in” into it and is very complicated. Please consider!
Leron Amin says
Hey Mike,
Thanks for reaching out!
I’ve already published an article on how to configure SSH tunnels, and you can view it here. Be sure to check out the comments at the bottom of that tutorial as well, as some experienced developers have gone over problems that they faced and solutions on how to resolve them.
Let me know if you have any questions,
Joe
patrick perez says
I still have to buy the domain name before proceeding right? And is there a way to do it through Amazon instead of other services?
Leron Amin says
Hi Patrick,
You can buy a domain directly through Amazon’s Route53, but I’ve never done this before so I can’t recommend it.
Hope this information helps,
Joe
Ay says
Hello my friend
the Route53 service not included in the free tier in Amazon
Are there any way to use AWS EC2 with Cloudflare without using Route53
or any way to add the domain to AWS EC2 without using Route53
Leron Amin says
Hi Ay,
Yes you can, just follow this tutorial here.
To do this in CloudFlare would be more complicated, as CloudFlare requires that you use their nameservers. It’s something you’d have to look into.
Good luck and let me know if you have any questions,
Joe
Leron Amin says
Did this tutorial work for you?
Please share your questions and comment below!